Team Setup
- Assign team roles, just like last week.
- Briefly discuss the roles, and consider to change or clarify them.
- See if you had any improvements or follow-ups from last week, and act on them.
Modeling and Deployment Diagrams
Today's team activity is about a system to control rice irrigation in Malaysia. For rice to grow, the water levels need to be controlled. Read the following "application story" from Kontron, a manufacturer of embedded computers used for industrial purposes. (This is obviously advertisement for their products, but the system description is at a very good level of detail for this task.)
Adding IoT to Water Works Wonders for Malaysian Rice Growers
Your task will be to create a deployment diagram for this system, based on the information from the story.
Step 1: Individual Read-Through
Read the application story individually, and pay attention on the technical details, but also on the context of the system.
- Make notes.
- Highlight portions of the text that you find relevant.
- Lookup terms that you don't understand.
When reading through, you will at some places meet a lot of details, where you may wonder if they are important or not. In other parts of the description you may see a need for more detailed explanations. This is part of the reason why we create the deployment diagram first. Think and decide for yourself which details are important at this stage. If you need to add information or make assumptions, feel free to do so.
Step 2: Discuss the System
Discuss the system together. Discuss how it works, how it is structured, what its goals are.
Step 3: Individual Diagram Sketches
Each on their own, make some sketches using pen and paper for a deployment diagram.
- Don't necessarily try to make the entire diagram yet.
- Study different alternatives or modeling elements.
Step 4: Sketch of Diagram
- Compare your ideas and find commonalities, discuss differences. (Take a photo with your phone and share it.)
- Iteratively agree on a diagram you want to build.
- Outline the diagram, ideally on a whiteboard, blackboard or a shared piece of paper.
- If working digitally: Be practical and inventive how to do that via Teams. There is a digital whiteboard, or you can send photos of your sketches.
Step 5: Quality Awareness
Before you start with the final diagram, let's ask: What makes a good deployment diagram? Learning to evaluate a diagram is part of the learning process. In the end, a diagram is good when it is useful. Describing this is difficult, but we can at least come up with a list of criteria and points to consider.
Have a look at the table below, which is also called a rubric. It lists criteria in different categories, which should help as a framework to understand the quality of a diagram.
Excellent |
Good |
Sufficient |
Not rateable |
|
|---|---|---|---|---|
Layout |
Layout follows a strategy that helps to understand the diagram. |
Layout is structured. |
Layout is structured. |
Layout is unstructured and random. |
Syntax |
Correct syntax. |
Correct Syntax. |
Overall good syntax, with a few minor errors. |
Major syntactical flaws. |
Level of Detail |
Consistent and intentional level of detail. |
Adequate detailing. |
Some inconsistencies, too much focus on some details on the expense of others. |
- Some tips for strategic layout.
- Some tips for tidy graphics.
- Syntax for deployment diagrams from the preparation.
- Getting the level of detail right may require the most judgement. Think which information is useful to the reader of your diagram, and which information rather clutters it up.
Step 6: The Final Diagram
Based on the previous step, create a polished diagram. For this time, we recommend you to try the tool Draw.io, because it offers to collaborate simultaneously. You can either work on a single machine with a shared screen or projector, or you can all log into the same shared diagram and work on your laptops.
- Try to create a diagram that provides you with a good overview of the system.
- Include relevant details.
- Try to build a good layout. Have several attempts, the first one may not be the best one.
Step 7: Self-Evaluation
On Teams find the template for the self-evaluation document Files > Unit 1... > Rice Farming Team XX.docx. Fill out the text for the criteria of the rubrics, and any other concerns not covered by the rubrics. (If you immediately come up with improvements, go back and change your diagram!)
Copy the diagram into the document.
Deliver the docx document including your self-evaluation and diagram, and deliver it on Teams with the filename Rice Farming Team XX.docx. Store it under Files > Unit 1... > Diagrams.
Peer Review of Diagrams
Now you ask another team for their diagram and self-evaluation. This requires some coordination, so that each team gets another diagram to comment on, and all diagrams are commented.
- We don't do the assignment beforehand since not all of you may be ready at the same time.
- Check in the document Coordination.docx on Teams and note there on which team you comment.
- Check with the student assistants.
Have a look at the diagram of the other team. We recommend to do this on the original online version. (Ask them for sharing access or duplicating the diagram). Add notes into their diagram, using UML comments.
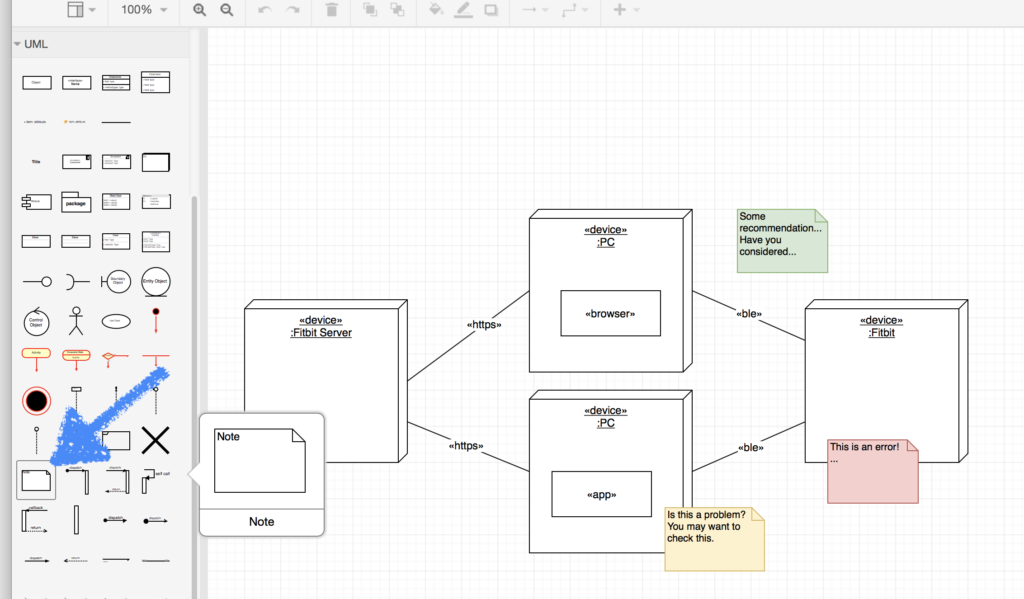
Use red for errors, green for general comments or recommendations, yellow for ambiguous cases.
Include your commented diagram in a copy of the original document.
Deliver your comments on Teams with the filename Rice Farming Team XX comments by Team YY.docx. Store it under Files > Unit 1... > Diagrams with Comments.